

Controlling a distant computer as if you were physically in front of it is often a challenge. That’s where an IP KVM (Keyboard, Video, and Mouse) can save the day.
I love tinkering with servers and remote administration tools, so when I first came across the JetKVM, I was excited to see a new device promising to make remote BIOS access, OS installs, and troubleshooting a breeze.
In this post, I’ll share my thorough review, insights, and experiences with this tiny but mighty unit, highlight its specs, compare it to a few competing solutions, and show why I find it so useful—especially for anyone in the homelab or professional IT space.
Get ready for a deep dive into a tool that might just revolutionize how you handle remote PC access!
Below, you’ll discover why the JetKVM stands out, how to integrate it into your environment, and the ways it can simplify your remote server or workstation routine.
Let’s take a look at features, open source developments, self-hosting possibilities, as well as common questions people ask. Along the way, I’ll also share a few essential tips I’ve picked up while putting the JetKVM through its paces. Let’s dig right in!
What Is JetKVM and Why Does It Matter?
The JetKVM is an IP-based KVM device that provides both local and remote keyboard, video, and mouse functionality, no matter your computer’s state.
Need to reset a BIOS setting on a server at a remote site?
Wish you could install an operating system from scratch without physically hooking up a monitor and keyboard?
With JetKVM, you can do these tasks and more, all through a browser from anywhere on Earth.
It’s designed for a single host machine, but you can pair it with an HDMI switch or hub for additional flexibility. Some IP KVMs can be pricey, but JetKVM tries to deliver a feature-rich experience at a competitive cost.
Over time, it has impressed me with both its hardware design and a fast, low-latency remote console experience.
Compared to traditional screen-sharing software like RDP, VNC, or TeamViewer, the JetKVM doesn’t rely on any OS service or configuration.
It literally takes your machine’s raw video output (via HDMI) and keyboard input (via USB) for complete “bare-metal” or “out-of-band” control.
You can manage tasks before the OS even loads—one of the biggest advantages if you’re dealing with BIOS settings or rescue-mode installations.
Core Features at a Glance
From the moment I laid eyes on JetKVM, I noticed a few standout aspects that made it different from other IP KVM solutions:
Sleek, Solid Hardware Design
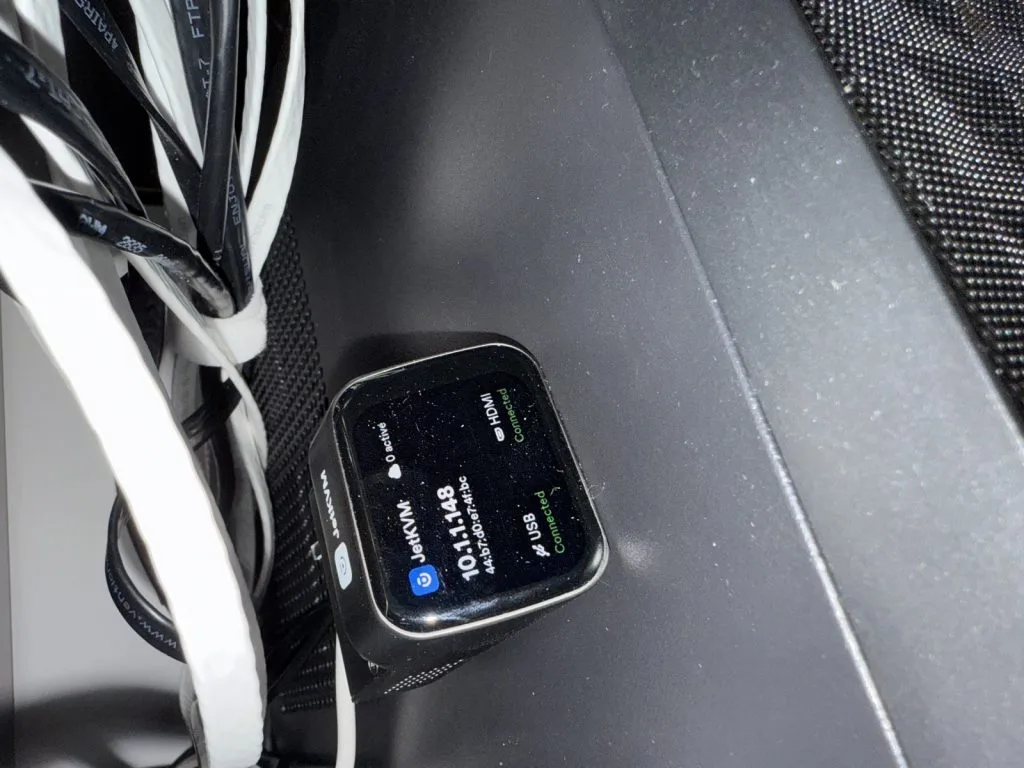
The JetKVM comes in a small metal enclosure with a surprisingly sturdy build. On its front is a watch-like “glass display” that shows the device’s status and local IP address.
This display might look like a novelty, but it’s quite handy. You can glance at it to see if the connected machine is sending an HDMI signal or if your USB cable is recognized properly.
Plus, it’s not some flimsy plastic contraption—everything about it feels robust and high-end.
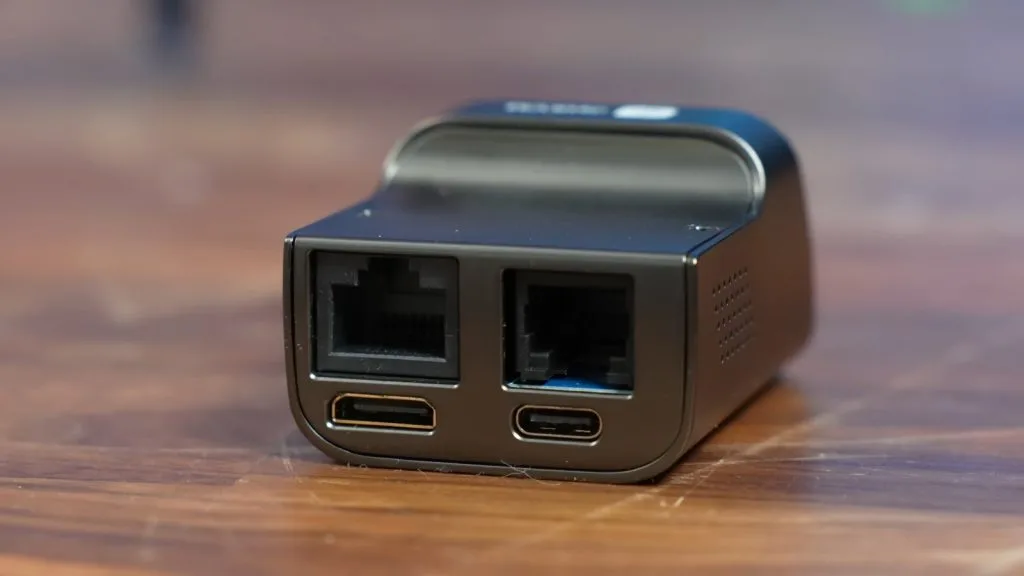
The back side of the JetKVM has a 100 Mbps Ethernet port for your local network, a mini HDMI input for the system’s video, a USB-C port for bridging the KVM’s keyboard and mouse, and an RJ11 port for optional add-ons like controlling power or other expansions.
You also get cables in the box—one mini HDMI-to-full HDMI plus a specialized USB-C splitter that can power the device, if the host PC’s USB port can’t supply power by itself.
Conveniently, everything you really need is included.
1080p at 60 FPS, Low-Latency Remote Console
The resolution is limited to 1080p at 60Hz, but that’s perfectly fine for typical server administration tasks or for controlling a remote workstation.
You won’t be playing fast-paced video games over an IP KVM, but the JetKVM’s compression and streaming are optimized enough that remote mouse movement and keyboard entry feel snappy, with some reporting latencies of only around 30-60 ms.
That’s pretty impressive for an embedded device this small.
Complete Out-of-Band Management
When your system is powered off, or if it’s stuck in a failed boot, the JetKVM still shows you exactly what you’d see on a locally connected monitor.
This is critical for diagnosing hardware issues, manipulating BIOS or UEFI settings, or for installing an entire OS from scratch.
If you want to insert an ISO remotely, JetKVM can emulate a USB drive with that ISO—allowing you to boot from it.
That’s a key benefit that standard remote desktop tools can’t provide.
Optional JetKVM Cloud Access
If you prefer a built-in remote solution without running your own VPN, the JetKVM Cloud is available.
It uses WebRTC with zero-trust architecture and user authentication to create a link from anywhere in the world. I generally use a self-hosted VPN or Tailscale for tasks like these, but for some, their cloud service is a convenient turn-key option.
And yes, it’s optional.
You can keep the JetKVM fully offline if you’d rather manage it with local IP access alone.
Setting Up and First Impressions
When I got my JetKVM, I was pleasantly surprised by how quick it was to get started.
The entire device is practically plug-and-play.
Connect the Ethernet cable from your LAN to the JetKVM, attach the USB-C and HDMI cables to your target machine, power it up—done.
The JetKVM boots, obtains an IP from DHCP, and displays that address on its front screen.
To manage your host machine, open a browser window to that IP address. The JetKVM’s admin page will pop up right away.
One of the first things I did was set up a password. By default, JetKVM will let you skip the password, but you definitely don’t want to do that in a serious environment, because this device grants full control over your host.
After that, you land on the remote console, which reveals the live feed from your connected system.
If the system is off or still booting, you’ll see exactly what you’d see on a monitor connected locally.
If it’s up and running, you can move your mouse around within the JetKVM webpage and interact with the OS.
Out of the box, I was amazed at the smooth, low-latency experience. You can easily click into the BIOS or tinker with system-level tasks in real time.
The interface includes a few neat features, such as:
- Virtual Media (mount an ISO or USB image to the remote system)
- Wake-on-LAN
- Paste clipboard text directly
- A small “virtual keyboard” for special key combos (Ctrl+Alt+Del, etc.)
- EDID presets for correct resolution
- Dark mode theme (if you prefer it, or want to reduce glare)
Most of these features worked flawlessly during my tests.
As for the front display, it’s possible to enable or disable timeouts, brightness, and so on.
The touchscreen aspect might still feel a bit experimental—I found it fine for occasional use.
But once you have the JetKVM set up, you rarely need to tap on its screen anyway.
Open Source Software and Community Contributions
One of the bigger selling points is that the JetKVM’s software is open source.
The team behind it built a Linux-based OS image, plus a KVM runtime in Go, and then layered on a web-based UI.
They posted most of their code to GitHub, allowing the community to make pull requests, fix bugs, or add features.
It’s quite refreshing to have a hardware KVM device that doesn’t lock you into some black box firmware. Instead, there’s real transparency about what’s running under the hood.
The only small hiccup was that the OS image itself took a bit longer to be released.
However, the team stated they would release it.
Over time, they have indeed been merging new contributions, adding features like Tailscale or better encryption for local logins, and generally proving that open source in this space really does work.
If you’re a developer or a Linux hobbyist, you can dive into the code, customize the UI, or even spin up your own build environment to hack new features into the device.

Self-Hosting and Cloud Independence
Many folks, myself included, get a bit uneasy about external cloud dependencies. JetKVM’s optional cloud service is easy to adopt, but you can ignore it altogether if you prefer.
If you’re comfortable with Tailscale or traditional VPNs, you can run your own network solution and manage everything locally.
It’s also possible to self-host the JetKVM’s cloud code, so that all the WebRTC connections go to your own infrastructure.
That’s a game-changer if you’re a privacy or self-hosting enthusiast who wants full control over every piece of your tool chain.
The official instructions on how to self-host rely on Docker images or deploying code to your own environment, which can be as straightforward or as involved as you like.
The key point is that JetKVM’s architecture doesn’t force you into any locked ecosystem.
You remain free to pick your own approach to remote connectivity, whether it’s a standard VPN, Tailscale, an SSH tunnel, or the official JetKVM Cloud.
The device will work just fine in offline LAN-only mode as well.
Pushing the Hardware Limits
Once I was confident the JetKVM was stable, I decided to test more advanced configurations.
I tried hooking it up to a third-party HDMI KVM switch (the EZCOO brand) that can handle multiple machines.
My goal was to see if I could effectively turn the JetKVM into a multi-port IP KVM by chaining the hardware.
It required a bit of patience around which USB cables to use and some minor quirks with hotkeys, but in the end, I did get it to work.
This was a perfect solution if you need more than one machine attached to a single JetKVM, though remember that extra hardware (like the EZCOO switch) will add some cost.
I also tried connecting a local display and keyboard to the JetKVM, effectively making it a local KVM as well as a remote IP KVM.
That was a little trickier because JetKVM only has a single HDMI input, not an HDMI out.
I used a separate splitter to mirror the video signal both to the JetKVM and to my local monitor.
While it mostly worked, there were some oddities with mouse input.
With a bit of patience, I believe these small issues can be fixed in software updates—so if local access is important, keep an eye on future firmware improvements.
Price, Modules, and Who Should Buy It
When it debuted on Kickstarter, the JetKVM carried an appealing price tag that was noticeably lower than many other IP-based solutions, especially those from big enterprise brands.
Now that it’s available more broadly, the cost typically sits around the same range, usually around $69 plus shipping or so.
This affordability is a big draw for those in the homelab scene.
Additionally, the creators are working on (or have released) extra modules you can connect via the RJ11 port.
These can let you control ATX power on a standard desktop motherboard or handle direct DC power switching on certain systems.
Those expansions aren’t necessary for basic IP KVM functionality, but they push the device closer to “true IPMI,” letting you physically cut power or force a cold reboot if needed.
If you run remote sites or frequently handle misbehaving PCs, that is a massive advantage, since a software-based reboot can fail if the system is frozen at the BIOS level or hung entirely.
So, who benefits most from JetKVM? In my opinion, the best use cases are:
- Homelab enthusiasts wanting BIOS-level remote control
- IT pros managing remote offices with consumer or workstation hardware
- Anyone who wants a simple, powerful way to fix PCs from afar without traveling
- Users looking for open-source solutions (rather than locked vendor firmware)
- Those hoping to unify remote solutions—like using Tailscale or custom Docker cloud hosting
For typical desktop usage, such as remote desktop for day-to-day tasks, you’d probably do better with standard remote software.
But whenever you need that raw, boot-level access, JetKVM saves you time and travel.

JetKVM vs. NanoKVM and Other Alternatives
You’ll often see comparisons between JetKVM, NanoKVM, PiKVM, and a few other embedded solutions.
While each of them has the same core function—remote keyboard, video, and mouse—they differ in key details:
NanoKVM
NanoKVM, especially the “Full” or “PCIe” versions from Sipeed, aims for a compact form factor. Some models have optional Wi-Fi or PoE.
They can emulate power button control directly to the motherboard front-panel pins.
While they’re generally priced in the same ballpark, the JetKVM often excels in build quality, interface smoothness, and the immediate availability of its open source repositories.
NanoKVM also has a cloud piece but required device activation downloads from servers in some variants, which made some users uneasy about data privacy.
Additionally, JetKVM’s metal enclosure and bright front display make it feel more polished.
If you just want the cheapest barebones solution, the Lite NanoKVM might be an alternative, but you’ll get fewer extras and a more “DIY” experience.
PiKVM or TinyPilot
These are do-it-yourself (or partially assembled) solutions based on Raspberry Pi boards.
PiKVM is fully open source.
TinyPilot has commercial kits. Both can be extremely powerful but may cost more because you need a Pi, plus specific HDMI capture hardware.
If you enjoy the modular approach or want a Pi-based device that can run other services, PiKVM is a great project.
For a simpler, integrated solution with a very small footprint, JetKVM is likely more convenient.
JetKVM also requires no standalone single-board computer on the side—everything’s contained in a single, compact enclosure.
Enterprise Solutions (Like Raritan, Avocent, or iDRAC/iLO)
Plenty of servers, particularly enterprise-grade ones, have built-in IPMI, iLO, or iDRAC modules.
Those solutions let you connect via a dedicated management port. They work similarly to JetKVM but cost more and are generally only available on high-end server hardware.
Standalone enterprise IP-based KVM switches from companies like Raritan or Avocent can run into the thousands of dollars.
They’re perfect for large data centers with multiple racks but definitely overkill for a single server or small homelab.
JetKVM is a fraction of that cost, so it’s way more appealing to individuals or small businesses.
Security Considerations
Security is important for any out-of-band management system.
By design, IP KVMs let you do practically anything to a target machine, so the stakes are high if someone obtains unauthorized access.
Here’s how the JetKVM handles security:
- Local Access Password: You can (and should) set a password for local access.
- Encryption: All remote data streams are carried over WebRTC with DTLS encryption, whether through the local network or JetKVM Cloud. This ensures that mouse clicks, keyboard inputs, and screen data are protected in transit.
- SSH Key Authentication: Developer or advanced modes require SSH key-based authentication (no password-based SSH). This makes tinkering fairly secure.
- Optional Cloud: If you don’t trust any external servers, you can skip the cloud connection. Place JetKVM behind a VPN or Tailscale, or self-host the cloud code to keep it all in-house.
The only area some may frown on is that the local admin interface in the browser defaults to HTTP.
There is no built-in TLS for direct LAN connections.
However, there’s an ongoing open-source effort to enable https out of the box. Meanwhile, you can adopt best practices like placing the JetKVM behind your VPN or setting up your own reverse proxy with a local certificate to ensure encryption if you’re connecting from outside your network.
In any case, the WebRTC streaming portion is encrypted, so the main concern is the web login session itself.
If you keep the device on a trusted VLAN, this is usually a non-issue, but it’s something to keep in mind if you operate in a high-security environment.
Step-by-Step Setup Tips
Here’s a simple walk-through on how I set up my JetKVM initially:
- Unbox the JetKVM and plug in the Ethernet cable from your LAN or management VLAN.
- Connect the USB-C splitter to the device’s USB-C port if your host’s USB port doesn’t provide enough power in standby. One side can be a dedicated 5V power input.
- Attach the included HDMI cable (mini HDMI to full HDMI) from JetKVM to your host machine’s HDMI output. Double-check that you’re using the correct port on the JetKVM (it’s clearly labeled “HDMI”).
- On your host machine, plug the other USB cable from JetKVM’s USB-C into a standard USB Type-A port. This is how your host “sees” the keyboard, mouse, and virtual drive. If you want standby power, pick a USB port that stays powered even when the PC is off.
- Power up the host system. Check the JetKVM’s display. It should show an IP address once it’s connected to your LAN. It will also display “USB connected” and “HDMI connected” after your system is powered on and recognized.
- Open a web browser and go to
http://<the-IP-from-the-screen>. If you want to be extra safe, do this in a closed VLAN or set up your own secure approach. The JetKVM interface then prompts you to create a password. Definitely do it. - That’s it! You should see your system’s display output in the browser. You can click, type, or do just about anything you could do with a local keyboard and monitor.
From there, you can explore the settings screen, attempt a firmware update, adjust streaming quality, or even add the device to JetKVM Cloud.
Each step is well-labeled, so it’s not difficult to figure out.
If you’re advanced enough to attempt Tailscale or self-hosting, you’ll find community guides on the JetKVM Discord or GitHub repos.
Practical Use Cases
I’ve found JetKVM handy in more situations than I expected. Here are a few real-life examples where it saved me headaches:
- Installing Windows or Linux on a headless mini-PC: Instead of plugging in a separate keyboard, mouse, and display, I simply used JetKVM. I also uploaded the ISO, mounted it, and rebooted from that virtual drive. It felt like magic.
- Troubleshooting no-boot scenarios: My system was stuck at a BIOS error message that needed “F1” to continue. Without the JetKVM, I’d have to physically connect a monitor and keyboard. With JetKVM, I was able to see the error, press F1, and solve the problem from my desk in another room.
- Managing remote servers at a small office: If you have a homelab or small business server off-site, you can leave a JetKVM plugged in. Then, you can dial in via Tailscale or JetKVM Cloud to fix OS-level crashes or re-install if needed. No more panic drives across town.
- Multiple test rigs with one device: Paired with a 4-port HDMI/USB switch, the JetKVM can let me control multiple machines at once, changing which one I’m accessing with a keyboard hotkey. This effectively quadruples the value of a single JetKVM unit.
Potential Drawbacks and What Could Improve
Although I love my JetKVM, no product is perfect. Here are a few known limitations or areas I’d like to see refined:
- No built-in HDMI passthrough for local display: You must use a splitter or switch if you want a monitor attached alongside your IP KVM feed. That’s not ideal if you want a simple single-cable pass-through.
- Requires stable power from host USB or external supply: Some PCs don’t power the USB ports when they’re off, so you’ll need to split in external power to keep JetKVM awake. It’s not a huge deal, but be aware of the potential extra cable or power adapter.
- No native PoE (yet): Having Power over Ethernet is a dream for network gear, but the base JetKVM lacks PoE. That might change in future models, or you can use a PoE splitter. Still, it’s not built-in at this time.
- Local UI defaults to HTTP: This is common among IP KVMs, especially in lower-cost devices, but having an https interface from day one would be a plus. Thankfully, the streaming is secured by DTLS, but seeing a secure interface in the browser would be comforting.
- Screen is nice but somewhat underused: The front display is stylish, but you’ll rarely interact with it after initial setup. It’s a small point, but some might prefer a simpler, smaller display to reduce cost if that’s an option.
That said, I do think the JetKVM team is quite receptive to user feedback.
They roll out firmware updates frequently, many of which incorporate changes or fixes from the open source community.
So, these drawbacks might vanish or reduce over time.

Real-World Security Tips
As with any IP KVM solution, you should keep a few best practices in mind:
- Isolate the device on a dedicated management VLAN if possible.
- Enable strong local passwords (you can skip a password, but that’s highly risky).
- Don’t expose JetKVM to the internet directly. If you need remote access, either use Tailscale, a VPN, or the official JetKVM Cloud in a controlled manner.
- Keep firmware updated to ensure you have the latest security patches.
- Avoid plugging the KVM into suspicious hardware or networks you do not trust, as the device sees keystrokes and OS data at a very deep level.
As long as you treat it like any other out-of-band management hardware—and keep the device shielded behind your standard security perimeter— JetKVM should be safe.
FAQ: Common Questions About JetKVM
Below are some frequently asked questions that I’ve encountered from others curious about JetKVM.
These answers come from personal experience and official documentation or community insights.
1. Does JetKVM support audio over HDMI?
No, at present JetKVM doesn’t capture or stream audio signals over HDMI. It focuses on video and USB input.
If audio streaming is a critical requirement, you’ll need a separate method for audio capture and transmission.
2. Can I power on a completely switched-off PC with JetKVM?
If your PC supports Wake-on-LAN and the motherboard’s USB port supplies power in standby, yes, you can often wake it from S5 (soft-off) states.
However, a total power-off might require an add-on for ATX or DC control via JetKVM’s RJ11 expansion port.
Those modules let you physically manipulate the power pins on your motherboard.
Otherwise, software-based “power on” is limited to certain states the board supports.
3. Is it truly open source?
Almost all of it is. The developers have published the main runtime, UI, and cloud API on GitHub.
The base operating system image was delayed but now appears in progress or available. If you spot anything missing, you can check their GitHub or official channels for updates.
The community has already contributed bug fixes and features.
4. Is JetKVM suitable for gaming or high-motion content?
Technically you can stream anything on the monitor, but the encoding is geared for low-latency administration tasks, not high-fidelity gaming.
You can expect compressed 1080p, 60 FPS video with minimal frameskipping, but it’s definitely not meant as a game streaming box.
Think server or BIOS management, not a first-person shooter over the web.
5. How do I keep the device secure?
Set a strong password, keep it on a private VLAN or behind a VPN, and update firmware regularly.
Also, disable or avoid the cloud if you prefer purely local usage. The streaming channel itself is encrypted via WebRTC, so that part is safe if your network is secure.
6. Can I self-host the JetKVM Cloud software?
Yes. The main cloud components are open source. You can deploy them with Docker images or on Kubernetes. This allows you to use WebRTC-based remote access without relying on the official JetKVM Cloud.
It’s a bit more advanced, but fully possible.
7. Does JetKVM support Wi-Fi?
No. At the moment, there’s no integrated Wi-Fi. Since it’s largely aimed at stable, wired management networks, that’s not surprising.
You could theoretically try adding a USB Wi-Fi adapter via the Linux OS, but it’s not officially supported out of the box.
8. What’s the max resolution and refresh rate?
The device captures up to 1080p at 60Hz.
You can set custom EDID if you wish, but 1080p60 is the recommended sweet spot for both performance and clarity in a typical homelab environment.
9. Does it require special drivers on Windows or Linux?
No drivers needed.
The host machine recognizes JetKVM as a standard USB keyboard, mouse, and USB mass storage (for virtual media).
This makes the device OS-agnostic.
10. Can it manage multiple machines simultaneously?
Not natively.
JetKVM is built for one computer at a time. However, you can chain it with an HDMI/USB KVM switch.
Then, you can toggle which machine’s feed is sent to JetKVM. This effectively expands the single device into a multi-port solution, though it requires extra hardware.
11. How do I mount an ISO for OS installation?
You can upload an ISO to the JetKVM’s internal storage (about 6 GB is free).
Then, the device emulates a USB drive to the host, letting you boot from it. Alternatively, you can point JetKVM at a public URL for an ISO, or use a “browser mount,” though that can be slower.
The local storage approach is fastest for full OS installs.
12. Does it handle local input from a keyboard or monitor?
Officially, no direct pass-through.
You have to get creative with splitters and hubs. In practice, you can feed the same HDMI signal to both JetKVM and your monitor, but there’s no built-in local output port.
The developers may add local keyboard/mouse pass-through in future expansions, but it’s not a default feature.
13. How is the cloud login handled?
Currently, it’s based on Google OIDC sign-in, meaning you authenticate with your Google account, and JetKVM’s WebRTC system pairs with your device.
The device claims a zero-trust approach, but if you dislike Google, you can self-host or keep it local.
The official JetKVM Cloud is optional and free, but not mandatory.
14. Can JetKVM integrate with Tailscale directly?
You can install Tailscale on JetKVM if you enable SSH developer mode and configure Tailscale on the underlying Linux OS.
It’s an advanced procedure, but definitely doable. Some community members have done it with success, allowing you to access your JetKVM from anywhere using Tailscale.
15. Is there any plan for 4K support?
At the moment, there’s no official sign of 4K support.
The device hardware focuses on 1080p. 4K streaming would require significantly more processing and bandwidth, so that might call for an entirely different hardware revision in the future.
16. Does the JetKVM display burn in if it’s on all the time?
The unit uses a watch-like display, typically a small TFT or similar technology.
It’s not known for easy burn-in like some OLEDs.
Still, you can set the display to sleep or dim after a certain period in the JetKVM settings, which helps preserve the screen over the long run.
17. Will it be sold widely outside Kickstarter?
Yes.
Many backers have already received their devices, and some shipping batches are complete.
The official plan is to make it available on retail platforms, including Amazon in some regions. Keep an eye on the JetKVM site or community for updates.
18. What if my motherboard only has VGA output?
JetKVM expects HDMI input. If you have VGA only, you’ll need a VGA-to-HDMI adapter.
Not all adapters handle the handshake perfectly, so choose a reliable, active converter if your machine is older or strictly VGA-based.
19. Can JetKVM be installed inside a PC like a PCIe card?
No.
JetKVM is an external device, about the size of a small box, with ports for network, USB, and HDMI.
For a PCIe approach, you might look at the NanoKVM PCIe or other specialized cards, but JetKVM is meant to live outside the case and remain physically separate.
20. Are there add-on boards currently shipping?
Some expansions for power control (ATX or DC) have started shipping or are in final stages.
If you ordered those via crowdfunding, they might arrive later than the main JetKVM device. Keep an eye on official updates or Discord to see if your add-on is shipping soon.

Conclusion
I’ve tested quite a few IP KVM solutions over the years, and JetKVM fits nicely at the top of my personal favorites.
It’s compact, capable, and—thanks to the open source approach—continually improving.
Being able to see the BIOS or troubleshoot OS re-installs without standing next to the machine is a game-changer for my homelab and for remote offices I help manage.
If you want a no-fuss approach to out-of-band access for consumer-grade desktops, servers, or testing rigs, JetKVM gives you that power at a truly competitive price.
It’s also easy to incorporate Tailscale or your own self-hosted environment, so you’re not forced to rely on external cloud management.
Yes, there are a few constraints—HDMI input only, no built-in PoE, and the lack of local pass-through—but most of these have feasible workarounds.
Considering the performance, reliability, cost, and open source emphasis, I recommend it wholeheartedly to anyone needing an easy way to manage remote hardware at the BIOS or OS installation level.
For me, the JetKVM is here to stay in my rack.
It has already shaved off hours of hassle, letting me handle critical issues from home instead of messing around with physical cables and rummaging for a separate monitor.
I look forward to seeing how the device evolves, and I’m excited about the possibilities the community might unlock through further open source contributions.
