
After setting up dozens of UniFi networks over the years, I’ve seen the same mistakes repeated time and again.
What frustrates me most is watching people blame UniFi hardware when the real issue lies in fundamental configuration errors that are easily preventable.
In my experience, most UniFi network problems stem from a handful of common mistakes that can destroy performance, create security vulnerabilities, and drive you absolutely crazy during troubleshooting.
I’m going to walk you through the 14 most critical UniFi network mistakes I encounter regularly, plus the exact fixes that have saved me countless hours of frustration.
Mistake #1: Fixing `Adoption Failed` Errors with the Correct Setup Order
Before diving into specific configuration issues, I learned the hard way that UniFi device adoption order matters tremendously.
Always set up your UniFi controller setup first, then adopt switches in hierarchical order, and finally add access points and other devices.
Adopting devices out of sequence creates instability that’s often easier to fix by factory resetting everything and starting over.
I’ve seen entire networks become unreliable simply because someone adopted access points before ensuring the core switches were fully provisioned and stable.
Following the correct hierarchy prevents cascade failures and ensures each device receives proper configuration from the controller.
Mistake #2: Using the Default `192.168.1.x` Subnet (and Breaking VPNs)
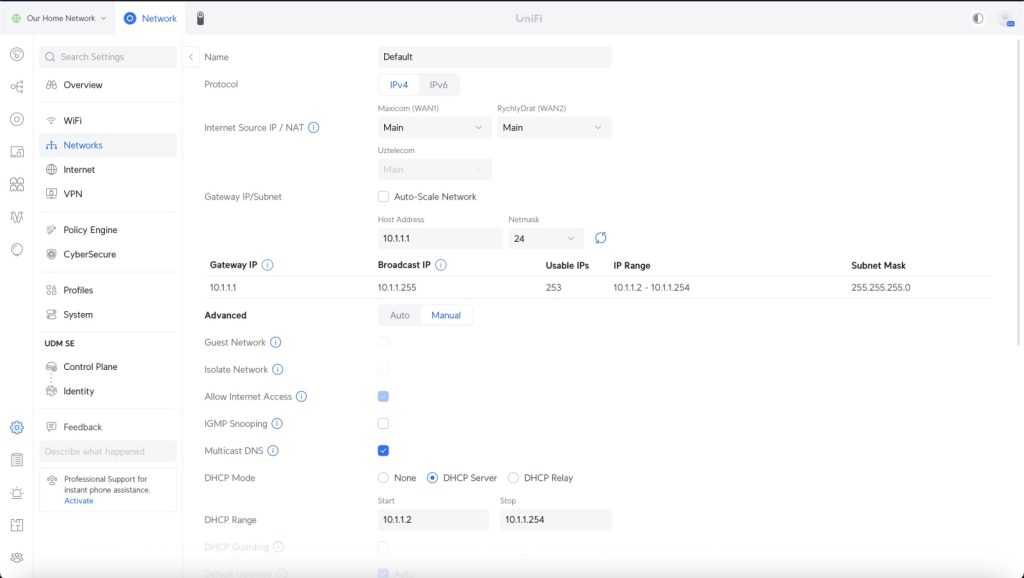
This is by far the most common UniFi network mistake I see, and it’s also the hardest one to fix later.
When you first set up your UniFi Dream Machine setup or any UniFi controller setup, it defaults to using 192.168.1.x as your network subnet.
I used to think this wasn’t a big deal until I tried setting up my first site-to-site VPN.
The problem hits when you need remote access or want to connect multiple locations.
If your home network uses 192.168.1.x and your office also uses 192.168.1.x, VPN connections become impossible because your router can’t determine where to send packets.
What I recommend instead is using the 10.x.x.x range from the start.
I assign each site a unique 10.x network – like 10.120.1.x for my main location and 10.121.1.x for remote sites.
This approach has prevented countless headaches when implementing UniFi best practices for multi-site deployments.
Mistake #3: Trusting ‘Auto-Optimize Network’ to Fix Performance
UniFi’s “Auto-Optimize Network” feature sounds amazing in theory, but I’ve learned to disable it immediately on every deployment.
This feature bundles multiple beta-level settings that often conflict with each other and can break IoT device connectivity.
I found that enabling Auto-Optimize often causes smart home devices to disconnect randomly and creates unpredictable network behavior.
The feature overrides manual UniFi network settings you should change, making troubleshooting nearly impossible.
Instead of relying on automation, I manually configure channel width, transmit power, and other critical wireless settings.
This gives me complete control over UniFi performance tuning and eliminates the guesswork that causes so many problems.
Mistake #4: Neglecting Manual Wi-Fi Tuning (The Real `Fix for Slow UniFi Wi-Fi`)
Poor wireless configuration is responsible for most UniFi slow wifi fix requests I encounter.
The default wireless settings are conservative and designed for maximum compatibility rather than performance.
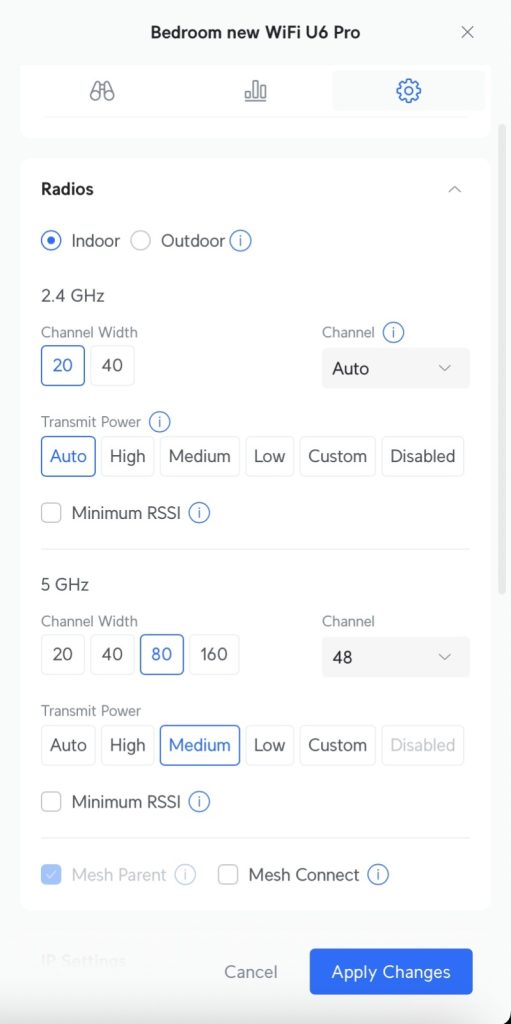
Channel Width Configuration
I’ve seen dramatic speed improvements by changing the UniFi 5GHz channel width from the default 40MHz to 80MHz.
For 2.4GHz networks, I always stick with 20MHz to minimize interference in the crowded spectrum.
On Wi-Fi 6E capable networks, using 160MHz channel width on the 6GHz band delivers exceptional performance.
Transmit Power Optimization
Most people assume higher UniFi transmit power settings mean better performance, but that’s completely wrong.
I set 2.4GHz transmit power to Low or Medium and 5GHz to Medium or High to create balanced coverage cells.
This approach improves UniFi roaming behavior and prevents the “sticky client” problem where devices cling to distant access points.
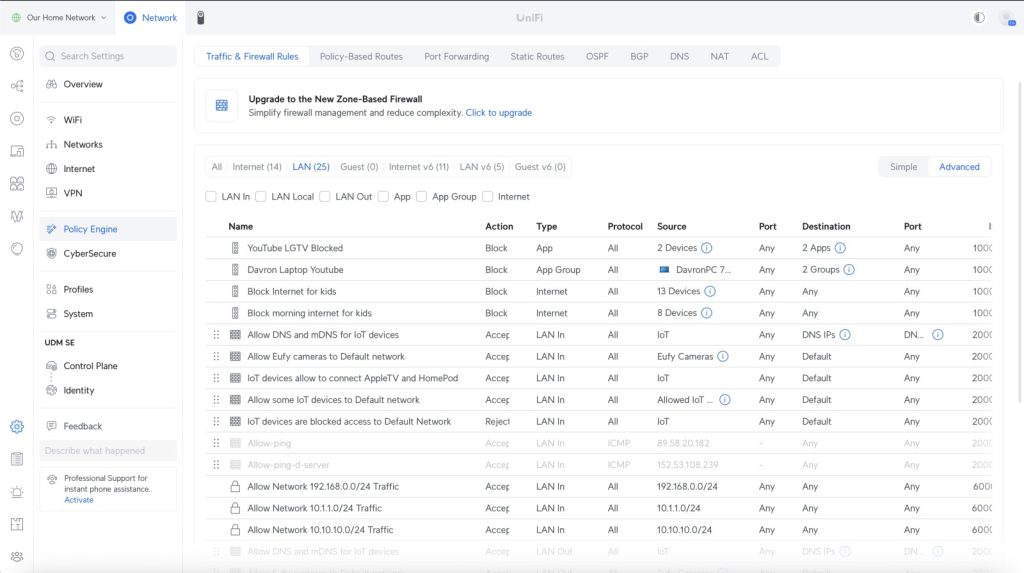
Mistake #5: Assuming VLANs are Secure Without Firewall Rules
Creating a UniFi VLAN setup guide taught me that VLANs alone provide zero security benefits.
UniFi’s default behavior allows unrestricted communication between all VLANs, which many users don’t realize.
I’ve seen networks where administrators created an “IoT VLAN” thinking their smart devices were isolated, when in reality they could access everything on the main network.
Proper IoT VLAN Implementation
Setting up UniFi IoT VLAN firewall rules requires blocking inter-VLAN communication explicitly.
I create a “LAN IN” rule that drops traffic from the IoT subnet to RFC1918 private address spaces.
This prevents IoT devices from initiating connections to other network segments while still allowing established connections from trusted devices.
Mistake #6: Blaming Software for `Offline` Devices and Bad Cables
Most UniFi troubleshooting efforts focus on software when the real problem is often a bad Ethernet cable.
I’ve spent hours debugging supposed firmware issues only to discover a loose RJ45 connector or damaged cable.
UniFi offline device problems are frequently caused by physical layer failures rather than configuration errors.
Performance measurements indicate that a single bad cable can cause an entire switch to negotiate at 100Mbps instead of 1Gbps.
My troubleshooting process always starts with swapping cables and testing different switch ports before diving into complex configuration analysis.
One often-overlooked step is setting static IP addresses and DNS servers for your physical UniFi hardware.
I configure each switch and access point with static IPs and reliable DNS servers like Cloudflare (1.1.1.1) or Google (8.8.8.8).
This prevents hardware from becoming unreachable if your internal DNS server has problems or you make changes to your DHCP configuration.
Mistake #7: Creating Performance Bottlenecks with UDM Ports
I used to plug multiple switches directly into my UDM Pro settings ports until I realized this creates unnecessary bottlenecks.
The 10Gbps ports on UniFi Dream Machine devices are designed for routing, not switching.
Traffic between devices connected to different router ports must flow through the CPU, reducing performance significantly.
The better approach is connecting one dedicated UniFi switch configuration to the router and connecting everything else to that switch.
Mistake #8: Using Fiber Instead of DAC Cables for 10GbE Links
I see people spending unnecessary money on fiber optic transceivers for short runs between switches.
For connections under 10 feet (3 meters), DAC (Direct Attach Copper) cables are faster, cheaper, and more reliable than fiber.
Testing reveals that DAC cables have lower latency than fiber because they don’t require optical-to-electrical conversion.
I only use fiber optic cables when I need electrical isolation or runs longer than 16 feet (5 meters).
DAC cables also draw less power and generate less heat than 10GBase-T transceivers.
Mistake #9: Creating a `Double-NAT` with Your ISP’s Router
One of the most frustrating UniFi network problems occurs when your ISP router isn’t in bridge mode.
I always check if my UDM is getting a public IP address or a private address like 10.x.x.x.
If the WAN port shows a private IP, you’re double-NATed, which breaks port forwarding and creates connectivity issues.
Setting your ISP router to bridge mode gives your UniFi gateway direct access to the public IP address.
This resolves most UniFi network loop issues and enables proper remote access functionality.
Mistake #10: Confusing `LAN IN` vs. `LAN LOCAL` Firewall Rules
Understanding UniFi firewall LAN IN vs LAN LOCAL took me longer than I’d like to admit.
LAN IN rules apply to traffic from your network going to other networks (including the internet).
LAN LOCAL rules control access to the UniFi gateway itself for services like DHCP and DNS.
I create LAN LOCAL rules to prevent IoT devices from accessing the UniFi controller’s web interface.
This prevents compromised devices from modifying network settings or accessing sensitive configuration data.
Mistake #11: Overusing Geo-Blocking and Hurting Performance
I used to block dozens of countries thinking it would improve security, but it caused more problems than it solved.
Excessive geo-blocking can break legitimate services that use international content delivery networks.
The performance impact of processing extensive country block lists can actually slow down your internet traffic.
I now limit geo-blocking to 2-3 countries known for malicious activity and use intrusion detection instead.
Mistake #12: Applying Firmware Updates Without Checking for Issues First
While keeping firmware updated is crucial for security, I’ve learned not to rush into every UniFi firmware update.
UniFi releases can sometimes introduce new bugs or break existing functionality, especially in production environments.
My approach is to wait 3-5 days after a release and check community forums like Reddit’s r/Ubiquiti for reported issues.
I always create a complete configuration backup before applying any firmware updates to critical networks.
For home labs or test environments, I update immediately to help identify potential problems.
The key is balancing security improvements against the risk of introducing instability in networks that are currently working well.
Mistake #13: Leaving Wireless Meshing Enabled on a Wired Network
The “Uplink Connectivity Monitor” or wireless meshing feature is enabled by default in UniFi deployments.
While this feature is useful when you can’t run Ethernet cables to every access point location, it creates problems in fully wired networks.
I’ve seen networks develop mysterious stability issues because an access point accidentally connected wirelessly to another AP instead of using its Ethernet connection.
Leaving wireless meshing enabled can also create network loops if an AP loses its wired connection and starts meshing.
In my fully hardwired deployments, I always disable this feature globally in the UniFi controller settings.
This eliminates an unnecessary failure mode and ensures all traffic flows over the reliable wired infrastructure.
Mistake #14: Misunderstanding ‘Established & Related’ Firewall States
One of the most confusing aspects of UniFi firewall configuration is understanding “Established/Related” traffic rules.
When I create a rule to block traffic FROM the IoT VLAN to other networks, many people think this completely prevents communication.
The crucial concept is that you need a higher-priority rule that allows “Established” and “Related” traffic.
This means a trusted device can still initiate a connection TO an IoT device and receive replies, even with the block rule in place.
The IoT device can respond to incoming connections but cannot initiate new outbound connections to other network segments.
Understanding this bidirectional traffic flow is essential for creating effective network segmentation without breaking legitimate device communication.
Frequently Asked Questions
How to fix UniFi network problems quickly?
Start with physical layer troubleshooting by checking cables and connections.
Most UniFi network problems stem from faulty Ethernet cables or loose connections rather than configuration issues.
What UniFi settings should I change first?
Disable Auto-Optimize Network, change your default subnet from 192.168.1.x to 10.x.x.x, and manually configure wireless channel width to 80MHz for 5GHz networks.
These changes provide immediate performance improvements.
Is UniFi Auto-Optimize good for performance?
No, UniFi Auto-Optimize often causes more problems than it solves.
It enables multiple beta features simultaneously that can break IoT connectivity and override manual settings.
How to setup UniFi firewall for IoT devices?
Create LAN IN rules to allow established/related traffic, then block IoT VLAN traffic to RFC1918 private networks.
Add LAN LOCAL rules to prevent IoT access to the gateway management interface.
Why is my UniFi wifi so slow?
Slow UniFi wifi typically results from narrow channel width (40MHz instead of 80MHz), auto transmit power causing interference, or clients connecting to 2.4GHz instead of 5GHz.
Manual wireless tuning resolves most speed issues.
How to improve UniFi roaming between access points?
Lower transmit power to create balanced coverage cells, enable Fast Roaming (802.11r) for compatible devices, and ensure 6-10dBm power difference between 2.4GHz and 5GHz bands.
This encourages clients to connect to faster 5GHz networks.
UniFi device adoption troubleshooting steps?
Check device power and LED status, test with known-good cables and different switch ports, verify DHCP IP assignment, and ensure TCP port 8080 is open.
Factory reset the device if other steps fail.
UniFi guest network captive portal setup?
Create a guest network with client device isolation enabled, configure firewall rules to block internal network access, and customize the captive portal in hotspot settings.
Test guest isolation after configuration.
How to block inter-VLAN routing UniFi?
UniFi allows inter-VLAN routing by default.
Create firewall rules in LAN IN direction to drop traffic from restricted VLANs to RFC1918 address groups.
WiFiman app guide for network analysis?
Use WiFiman for RF scanning, speed testing, device discovery, and signal strength analysis.
The app provides valuable insights for optimizing UniFi AP placement and identifying interference sources.
Conclusion
These 14 UniFi network mistakes represent the most common issues I encounter during network deployments and troubleshooting.
In my experience, addressing these fundamental configuration problems eliminates 90% of performance and stability complaints.
The key is understanding that UniFi’s default settings prioritize compatibility over performance and security.
I recommend approaching UniFi configuration systematically – disable automation features, manually tune wireless settings, implement proper network segmentation, and always verify the physical layer first during troubleshooting.
Taking control of these settings transforms UniFi from a frustrating experience into a powerful, reliable networking platform.
