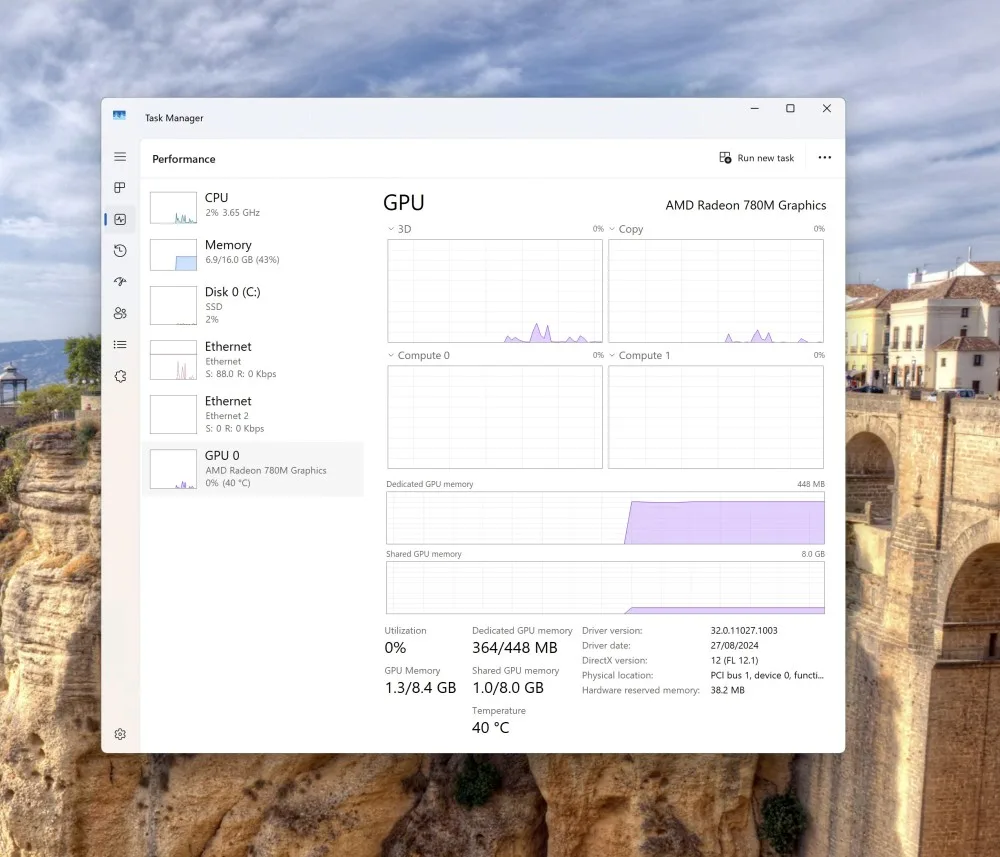
I’ve spent quite a bit of time perfecting the process of enabling iGPU passthrough for the AMD 8700G/8700GE with Radeon 780M in Proxmox. This setup lets you tap into the integrated graphics horsepower directly inside a Windows VM, offering improved performance for video editing, gaming, or just creating a smoother desktop experience.
In this post, I’ll walk you through every step, show you how to solve common issues like the AMD reset bug, and ensure you get the most out of your hardware. By the end, you’ll have a fully configured environment that harnesses the AMD Radeon 780M iGPU for hardware-accelerated performance.
Understanding iGPU Passthrough and Why It Matters
Enabling iGPU passthrough in Proxmox lets you allocate your AMD 8700G/8700GE’s Radeon 780M integrated graphics directly to a Windows VM. This allows the VM to use the GPU for hardware-accelerated tasks, bypassing standard software emulation and delivering near-native performance.
You’ll see smoother graphics in Windows, faster video rendering, and the ability to run GPU-accelerated applications that previously struggled in a virtualized environment. It’s all about leveraging the hardware you already have, making virtualization a more powerful solution.
Key Components of iGPU Passthrough
This process involves multiple layers: Proxmox VE as the hypervisor, VFIO for PCI device passthrough, IOMMU for hardware-level mapping, and Windows running inside a VM configured with VirtIO drivers and the AMD GPU driver. Getting them all aligned is the magic recipe.
Don’t worry if some of these terms sound technical. I’ll guide you step-by-step, so you can get it done even if you’re not a Linux or networking pro.
Prerequisites: Preparing Your Proxmox Environment
Before getting started, make sure you have a working Proxmox VE installation, preferably Version 8.x or higher. This ensures a more recent kernel and better compatibility. You’ll also need a Windows ISO and VirtIO driver ISO ready.
Your hardware should support IOMMU (check your motherboard’s BIOS). Also, confirm that your AMD 8700G/8700GE iGPU (Radeon 780M) is recognized by the system. Basic Linux knowledge helps, but I’ll keep commands and steps clear and concise.
If paths or IPs appear, remember to replace them with your actual server details, like
What You’ll Need
- Proxmox VE 8.x or later
- Windows ISO and VirtIO drivers ISO
- AMD 8700G/8700GE processor with Radeon 780M iGPU
- Basic command-line skills
Step 1: Enable IOMMU on the Proxmox Host
IOMMU allows direct access of the VM to the GPU. Without it, the passthrough won’t function. This is a crucial step to ensure Proxmox can handle device assignment correctly.
First, edit the bootloader configuration to enable IOMMU in “pt” mode. Then, update and reboot.
Use the following commands on your Proxmox host:
sed -i 's/GRUB_CMDLINE_LINUX_DEFAULT="quiet"/GRUB_CMDLINE_LINUX_DEFAULT="quiet iommu=pt"/g' /etc/default/grub
update-grub
reboot
After rebooting, verify IOMMU is active:

dmesg | grep -e DMAR -e IOMMU
If you see IOMMU-related lines, you’re all set. If not, double-check BIOS settings for IOMMU or AMD-Vi.
Step 2: Identify the AMD Radeon 780M iGPU
To proceed, you need the iGPU’s PCI ID. This ensures the host knows which device to passthrough to the VM. The following command helps you locate the device:
lspci -nn | grep -e 'AMD/ATI'
Look for a line mentioning something like “Advanced Micro Devices, Inc. [AMD/ATI] Phoenix1 [1002:15bf].” In this example, the PCI ID might be 0d:00.0 and the device ID is 1002:15bf.

Note that for the AMD 8700G/8700GE iGPU, you typically don’t have a separate audio device like discrete GPUs. This simplifies configuration since you only have to passthrough one PCI device.
Step 3: Configure VFIO for the iGPU Passthrough
VFIO ensures that the PCI device is detached from the host and made available exclusively to the VM. By using VFIO, the guest OS can interact with the GPU as if it was physically installed in that system.
First, load the necessary VFIO modules at boot:
echo "vfio" >> /etc/modules
echo "vfio_iommu_type1" >> /etc/modules
echo "vfio_pci" >> /etc/modules
echo "vfio_virqfd" >> /etc/modules
Next, bind the iGPU’s PCI ID to vfio-pci:
echo "options vfio-pci ids=1002:15bf" >> /etc/modprobe.d/vfio.conf
To ensure the host’s amdgpu driver doesn’t grab the iGPU first, add a soft dependency:
echo "softdep amdgpu pre: vfio-pci" >> /etc/modprobe.d/vfio.conf
Finally, update the initramfs and reboot:
update-initramfs -u -k all
reboot
After reboot, verify the GPU is using vfio-pci:
lspci -nnk | grep -A 3 '0d:00.0'
If it shows “vfio-pci” as the driver, you’re on the right track.

Step 4: Extract and Configure the VBIOS
The VM often needs a proper VBIOS to initialize the GPU correctly. This can be critical for some AMD GPUs to ensure proper startup and avoid issues like blank screens. In order to pass the GPU device properly, we need to specify which GPU BIOS to use. We can extract it directly from the host or obtain it from a repository.
First, create a vbios.c file on your Proxmox host with the following content and compile it. Then, run the resulting binary to extract the VBIOS file. If you encounter difficulties, refer for additional info here.
After compiling and running vbios.c you’ll get a vbios_*.bin file. Place it in the proper directory:
gcc vbios.c -o vbios
./vbios
mv vbios_*.bin /usr/share/kvm/vbios_780m.bin
Having the correct VBIOS ensures the GPU initializes properly within the Windows VM, reducing issues like corrupted displays or failed driver installs.
Step 5: Create and Configure the Windows VM
Now it’s time to build the Windows VM in Proxmox and assign the iGPU. Using a Q35 machine type and UEFI OVMF BIOS helps with compatibility and performance, while enabling features like Discard and SSD emulation for storage helps with speed and longevity.
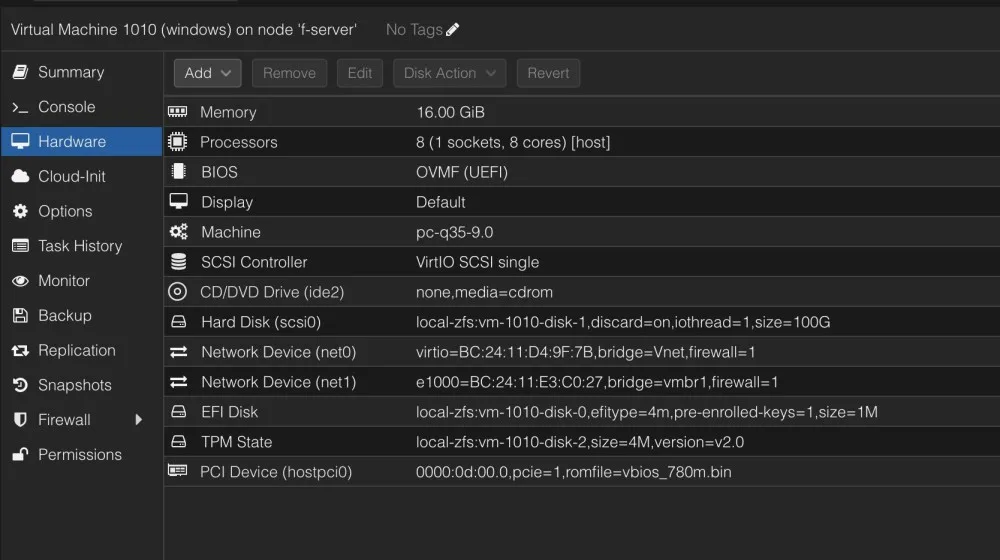
Create a new Windows VM via the Proxmox web interface. Use the Windows ISO and VirtIO drivers ISO you prepared. After the VM is created, you’ll edit its configuration file directly to add the passthrough device and romfile.
Open the VM’s configuration file:
nano /etc/pve/qemu-server/<VM_ID>.conf
Add or modify entries as needed, for example:
agent: 1
args: -cpu 'host,-hypervisor,kvm=off'
bios: ovmf
boot: order=scsi0;ide2;net0
cores: 8
cpu: host
efidisk0: local-zfs:vm-<VM_ID>-disk-0,efitype=4m,pre-enrolled-keys=1,size=1M
hostpci0: 0000:0d:00.0,pcie=1,romfile=vbios_780m.bin
ide2: none,media=cdrom
machine: pc-q35-9.0
memory: 16384
name: windows
net0: virtio=<MAC_ADDRESS>,bridge=vmbr0,firewall=1
numa: 0
ostype: win11
scsi0: local-zfs:vm-<VM_ID>-disk-1,discard=on,iothread=1,size=100G
scsihw: virtio-scsi-single
smbios1: uuid=<UUID>
sockets: 1
tpmstate0: local-zfs:vm-<VM_ID>-disk-2,size=4M,version=v2.0
vmgenid: <GENID>
Adjust the VM_ID, MAC_ADDRESS, UUID, and GENID placeholders. Once saved, start the VM and begin Windows installation. The iGPU is now passed through to the VM, but you still need drivers.

Step 6: Install VirtIO Drivers and AMD GPU Drivers
With Windows installed, you’ll need to ensure that the VM uses the best drivers. VirtIO drivers improve disk, network, and other performance aspects. The AMD GPU drivers let Windows directly use the Radeon 780M.
First, mount the VirtIO ISO and install all required drivers: VirtIO Storage, VirtIO Network, VirtIO Balloon, and so forth.
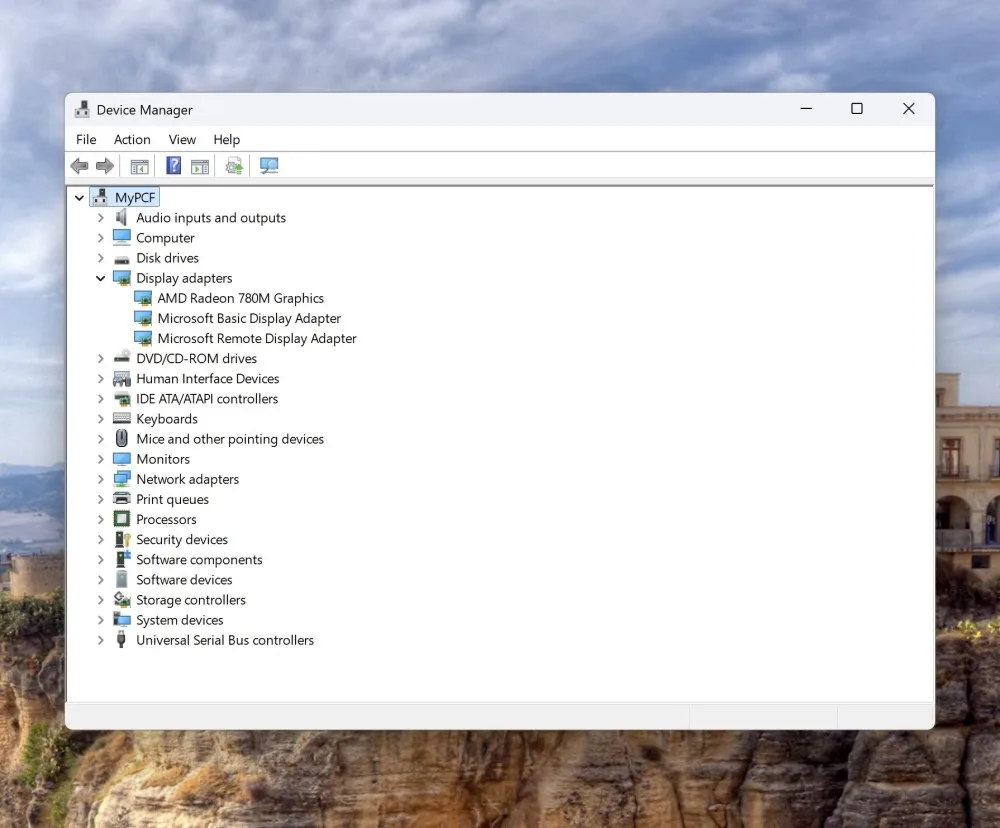
After that, grab the AMD GPU driver (use the official AMD installer). Offline versions are best to avoid unnecessary compatibility checks. Once installed, you should see the GPU recognized correctly in the Windows Device Manager.
Step 7: Addressing the AMD Reset Bug
The AMD reset bug is a well-known issue where the GPU doesn’t reset properly after a VM reboot, requiring a full host reboot. Thankfully, there’s a workaround: the vendor-reset module.
Install and enable vendor-reset:
git clone https://github.com/gnif/vendor-reset.git
cd vendor-reset
make
make install
modprobe vendor-reset
echo "vendor-reset" >> /etc/modules
With vendor-reset, your iGPU will have a better chance of resetting cleanly after VM shutdowns. However, note that some situations still require a full Proxmox host reboot.
Known Issues and Workarounds
Error 43 in Windows
If Windows displays “Error 43” for the GPU, it indicates the GPU failed to start. Often, a simple host reboot fixes this. This error can occur after changing configurations or drivers.
Remote Desktop Disables the iGPU
Sometimes using Windows Remote Desktop can disable the GPU in Device Manager. If that happens, just re-enable it manually.

Dealing with Reset Bugs
While vendor-reset helps, the reset bug isn’t always fully resolved. If the VM won’t start after a reboot, try rebooting the entire Proxmox host.
Optimizing Performance and Stability
Once your iGPU passthrough is working, you can fine-tune the setup. Tweak CPU and memory allocations, enable huge pages for better memory performance, and consider adding a dedicated SSD for your VM. The goal is to give your VM the best environment possible.
Using Q35 Machine Type and OVMF
The Q35 machine type and OVMF (UEFI BIOS) improve compatibility and performance. Q35 provides a modern chipset that works well with PCIe passthrough, while OVMF helps ensure Windows boots using UEFI. This combination often leads to a smoother experience.
Improving Disk Throughput
Use VirtIO SCSI for better disk performance and enable Discard and SSD emulation. This helps improve responsiveness and reduces disk wear. You can also consider caching options, but always test stability before going into production environments.
Networking Considerations
Use VirtIO network drivers for better throughput and lower latency. If you plan to run GPU-accelerated workloads that rely on network storage or streaming, a stable and fast virtual NIC is essential. Assign a dedicated NIC or VLAN if needed.
Testing and Validation
After setup, you’ll want to test performance. Run a few GPU benchmarks in the Windows VM and compare results to a native environment if possible. Test video playback, gaming, or 3D rendering tasks. You should see a substantial improvement over software-based graphics.
If something isn’t performing as expected, review your steps. Double-check IOMMU configuration, VFIO settings, and whether the vendor-reset module is loaded. Patience and careful troubleshooting go a long way.
Conclusion
By following these steps, you’ve unlocked the full potential of the AMD 8700G/8700GE with Radeon 780M iGPU inside a Proxmox Windows VM. This isn’t just a tech experiment; it’s a way to get near-native GPU performance for virtualized workloads, which can transform how you use your system.
Whether you’re into media editing, light gaming, or high-performance computing, having the iGPU directly accessible can make a huge difference. I hope you find this guide useful and that it helps you make the most of your Proxmox environment.
If you’re curious about more advanced tweaks or other GPU models, the principles remain the same: enable IOMMU, load VFIO, provide a proper VBIOS, and pass the device through. Happy virtualizing!


hi, thanks for the guide. one question: the intel iGPUs can be shared by up to 7 different VMs in proxmox. can the AMD iGPU do something similar, or can only one VM use the iGPU at one time?
Hi there, thanks for the question!
AMD iGPUs (APUs) don’t support SR-IOV/vGPU slicing like Intel’s do, so you can’t have multiple full VMs using the iGPU at the same time. You can assign the same PCI device to several VM configs, but at boot only one VM will actually bind to and use it .
With LXC containers it’s a bit different, containers share the host’s /dev/dri and driver stack, so you can run GPU-accelerated workloads in multiple LXCs concurrently. Under the hood it’s still one physical GPU, though, not separate vGPUs .
If you really need true multi-VM vGPU support, you’d have to pick an AMD card that explicitly offers MxGPU/SR-IOV (e.g., Radeon Pro V-series), rather than the integrated graphics.
Hope that clears things up!
“After compiling and running vbios.c you’ll get a vbios_*.bin file. Place it in the proper directory”..:???
What directory?, as it always throws up error no matter which?, despite setting CHMOD on file. Don’t point me to the other site either, as that is the same. What is this mysterious file??
“If it shows “vfio-pci” as the driver, you’re on the right track”.
It does, but an error that some directory don’t exist beforehand?