

I’ve always been fascinated by ways to enhance home networks beyond the basic ISP router. After countless experiments with different firewall solutions, I finally settled on pfSense. It gives me enterprise-like features—everything from advanced firewall rules to VPN services—on hardware that’s neither expensive nor complicated.
In this guide, I’ll share everything I’ve learned. I’ll show you how I pick and prepare hardware, burn the installation image, walk through the initial setup, and explain crucial pfSense features that help me secure and optimize my home network.
By the end, you’ll be equipped with the knowledge to install and configure pfSense confidently, no matter if you choose a dedicated physical machine or a virtual environment.
Let’s jump in!
Why I Chose pfSense Over Other Options
I started out with the default ISP router. It worked for basic web browsing but quickly felt limited once I wanted to segment devices or set up a safe way to expose certain services online.
I considered commercial firewalls and tried other open-source solutions like OPNsense or Sophos XG. Ultimately, pfSense felt the most accessible with the best balance of community support, features, and frequent updates.
I also like that pfSense can live on many types of hardware. Whether I install it on an older PC that supports AES-NI (hardware acceleration for encryption) or on a small fanless mini PC with multiple NICs, it fits smoothly into almost any home lab environment. The licensing is straightforward for the Community Edition, and if I ever need professional support, I can opt for a paid plan. For my learning projects, the free version does it all.
Choosing the Right Hardware Setup
Physical “Bare Metal” Installations
I’m a fan of installing pfSense on bare metal. It’s straightforward to grasp because one device equals one firewall. Just plug in a monitor and keyboard for the initial configuration. If you need strong reliability, you can buy a specialized box that has multiple NICs, low power consumption, and hardware AES support.
This is exactly what I did at first: I found an inexpensive mini PC that came with four 2.5 GbE ports, 8 GB of RAM, and a small SSD. That box made an excellent dedicated pfSense appliance without sacrificing much power usage.
When I first tried pfSense, I used an old computer with a few added network cards. It worked well but drew more power and made more noise. If quiet operation is important, I recommend a fanless mini PC with AES support. These devices are typically small enough to hide anywhere, and they’re perfect for 24/7 operation.
Virtualization Approach
Over time, I shifted some of my lab gear into a virtualized environment with a hypervisor (like Proxmox or ESXi). Running pfSense in a VM can simplify hardware usage since everything is consolidated.
However, the initial learning curve is steeper, especially regarding virtual switches, pass-through NICs, and VLAN tagging. Still, if you’re comfortable with virtualization, pfSense thrives in that setup, and it’s easy to snapshot or replicate the firewall VM if you run multiple hosts.
Planning the Network Architecture
Before I grab my USB drive and jump into the installer, I like to plan out how everything will connect. A typical approach is to place pfSense between the ISP modem and the internal home network.
- Put ISP router (if it’s a combination modem/router) in bridge mode if possible, so pfSense obtains the public IP directly.
- Connect the ISP modem or bridging device to the first port (often labeled as the WAN port) on pfSense.
- Connect the second port (LAN port) from pfSense to a network switch or directly to a single device, depending on your layout.
- If you have multiple VLANs or multiple subnets, you can add more physical interfaces or use VLAN tagging on the LAN side.
If bridging mode isn’t available, I can still let the ISP router do basic NAT, then set pfSense as another layer of NAT behind it. This is known as “double NAT.” It’s not ideal but workable if carefully configured. Some advanced features (like inbound port forwarding) can get tricky with double NAT, so bridging mode is always my preference if it’s offered.
Creating the Bootable pfSense USB
I find the pfSense images on the official download page. They typically come in two forms: an ISO for CD/DVD or a memstick image for USB. Since optical drives are rare these days, I always use the USB memstick variant. The process to create a bootable USB is straightforward:
- Download the “memstick” image from the pfSense official website.
- Launch a tool like Rufus or balenaEtcher on my computer.
- Select the memstick file as the source, and choose the USB flash drive as the target.
- Let it write and finalize.
Once done, I remove the USB stick from the computer and insert it into the future pfSense device. Then I power on the device and ensure it boots from USB, either by adjusting BIOS/UEFI settings or using the Boot Menu key (often F12 or ESC).
The Installation Process, Step by Step
This portion is where I see a text-based installer. Typically, I let it boot in multi-user mode by default. After some initial loading, pfSense presents the main menu for installation.
Accept the License
The first thing the installer does is show license terms. I press Enter to accept. This is typical for open-source software with a publicly available license.
Installation Mode and Partitioning
I choose “Install” instead of “Rescue.” Then I see an option for partitioning. Usually, I prefer the guided ZFS route. ZFS is more resilient against data corruption. If I don’t plan to use multiple disks or advanced RAID, I still pick the ZFS “stripe” option. Even with a single disk, ZFS offers checksums and can handle corruption better than older file systems.
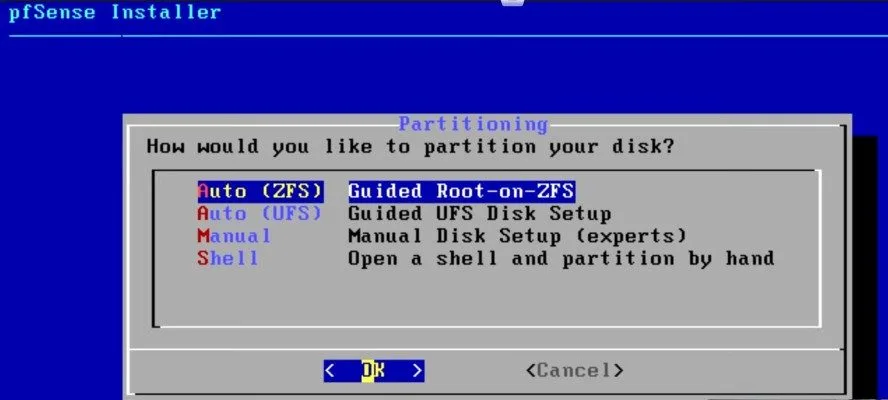
Choose Target Disk
The installer scans for available disks. I pick whichever drive I intend to dedicate to pfSense. Be sure it’s the correct one because everything on that drive will be erased.
Reboot from the New Installation
Once the files finish copying, the installer prompts me to remove the USB and reboot. On restart, the system boots from the internal drive, launching pfSense for the first time. I watch it detect interfaces and finalize its internal settings. At this point, I’m nearly done with the installation itself.
Interface Assignment and Initial Console Setup
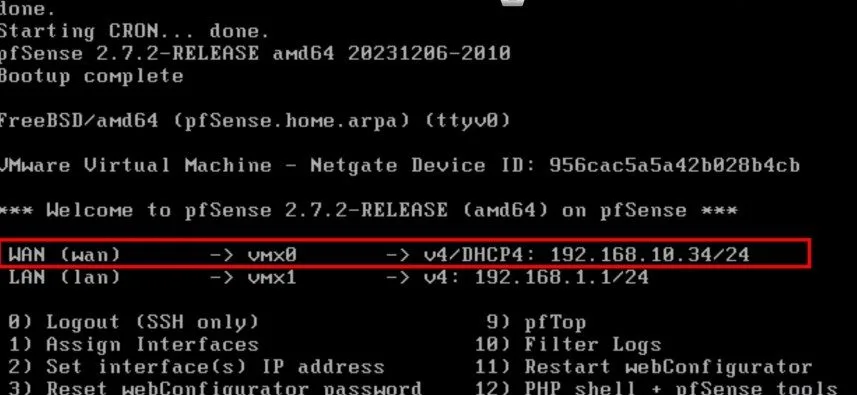
pfSense typically asks if I want to set up VLANs right away. If I only want a simple LAN and WAN, I answer “No.” I can always configure VLANs in the web interface later. Then pfSense asks which interface is WAN and which is LAN.
If the device has exactly two network ports, it may auto-detect them. But occasionally, I type them manually if I know which is physically connected to the internet and which is connected to the switch.
After that, pfSense displays the assigned IP addresses. By default, the LAN is usually at 192.168.1.1, and the WAN might be DHCP (if that’s how my ISP assigns addresses). If I see a private address on WAN, it might be behind double NAT. Otherwise, if bridging mode worked, I see a public IP address there.
Accessing the Web Interface
With the console setup complete, I plug my main computer into the LAN side. I ensure my computer either gets a DHCP lease or set it up with a static IP that fits the LAN network. Then I open up a browser and navigate to:
https://192.168.1.1
A warning about an untrusted certificate might appear. I bypass it. The default login credentials are admin for user and pfsense for the password. Once logged in, I see the pfSense Setup Wizard.
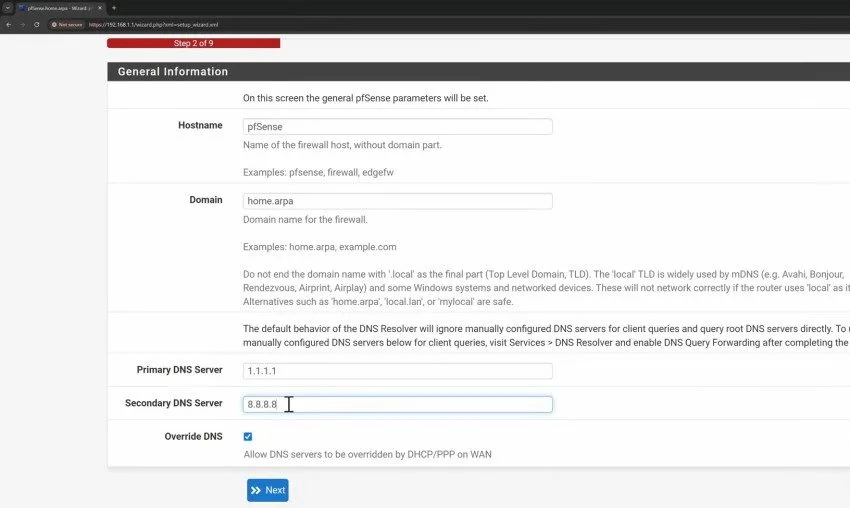
Setup Wizard Steps
- General Info: I can set a hostname (like pfsense.local), choose a domain, or specify DNS servers if I don’t want pfSense to rely on ISP DNS.
- Time Zone & NTP: I usually pick my region so logs and schedules are correct.
- WAN Configuration: If I have DHCP, it’s usually automatic. If my ISP gave me PPPoE credentials, I put them here. For static IP, I input the addresses and gateways accordingly.
- LAN Configuration: The default 192.168.1.1/24 is fine, but I can switch to something else, like 10.0.0.1/24, to avoid conflicts with the ISP device or other subnets.
- Admin Password: Absolutely crucial to change from the default to a secure password.
After the wizard applies these settings, pfSense restarts its services. Next, I land on the main dashboard. At this point, I usually check System > Update to ensure I’m on the latest stable release. Then I’m ready to explore deeper settings.
Core Features I Rely On
Firewall Rules
The Firewall menu has separate tabs for each interface (WAN, LAN, VLANs, etc.). By default, pfSense blocks inbound WAN and allows outbound LAN. If I need to open a port for a web server at home, for example, I can create a NAT port forward and add a matching rule so external traffic can reach the internal service.
DHCP Server & DNS Resolver
Under Services > DHCP Server, pfSense manages IP address distribution. I can define a range (e.g., 192.168.1.100 through 192.168.1.200) or reserve static IPs for particular devices based on their MAC addresses. In the DNS Resolver section, I can decide whether to do recursive lookups or forward to external DNS servers. I prefer the built-in “Unbound” DNS resolver for more control and speed in name resolution.
VPN Setup
Setting up a VPN inside pfSense is straightforward. If I need secure remote access to my home network, I can configure OpenVPN or IPsec with user authentication and certificates. Then I can connect from anywhere, seeing my local LAN as though I’m physically there.
VLANs for Segmentation
I love VLANs because they help me isolate IoT devices, cameras, and guests from my main network. Under Interfaces > VLANs, I create as many VLANs as needed. Each VLAN gets its own DHCP scope and firewall rules. This separation prevents a compromised IoT device from accessing or attacking my personal devices.
Traffic Shaping and Intrusion Detection
pfSense has traffic shaping features. That means I can prioritize streaming or gaming traffic over massive downloads to reduce lag. There’s also the option to install intrusion detection packages like Snort or Suricata. These can monitor suspicious activity in real time. For me, that’s powerful for a home setup, letting me see possible threats and block them automatically.
Bridging Mode vs. Double NAT Revisited
Many times, people ask me if bridging mode is absolutely necessary. I always recommend it if the ISP hardware supports it. That way, pfSense directly receives the public IP. It simplifies port forwarding, logging, and ensures there’s only one layer of NAT. If bridging isn’t possible, I can still disable DHCP on the ISP router and let pfSense handle everything else.
This does create double NAT, so it’s wise to weigh the pros and cons. Double NAT may break certain gaming or peer-to-peer apps unless you forward all ports from the ISP device to pfSense, and then from pfSense to the internal host.
Maintaining pfSense Long-Term
Once I have a stable configuration, I set up a routine for backups and updates. pfSense’s Diagnostics > Backup & Restore page lets me download an XML file containing all my settings. It’s surprisingly small and easy to import if something goes wrong or if I want to replicate the config on new hardware.
Updates and Package Management
Staying up to date is crucial for network security. Under System > Update, I can check for stable releases or apply minor upgrades. pfSense also has a built-in package manager, found under System > Package Manager, where I can install additional services like pfBlockerNG for ad blocking or Suricata for more advanced intrusion detection. I regularly keep an eye on new versions and read the changelog to avoid surprises.
Best Practices for Daily Operation
- Monitor Logs: Checking Status > System Logs reveals potential intrusions or interface issues.
- Fine-Tune Rules: I keep firewall rules minimal. More open ports mean a broader attack surface. I revisit them whenever I add or remove services.
- Segment Networks: Whenever I introduce new devices, I consider placing them in a separate VLAN, especially if they’re untrusted or part of a specialized system like a camera network.
Installing pfSense in a Virtual Machine
I’ve mentioned virtualization a couple of times, but here’s how I generally approach it. I first create a new VM in my hypervisor with enough CPU, at least 2 GB of RAM (preferably 4 GB or more), and a small virtual disk (16-32 GB is enough). I then attach two or more virtual NICs.
One NIC is physically bridged to the internet-facing port, and the other is bridged to the LAN side. This way, pfSense can treat them just like physical network cards.
From there, I attach the pfSense ISO or memstick image to the VM’s virtual CD, boot up, and do the same installation steps I would on bare metal. The main difference is that I keep an eye on network mapping in my hypervisor so the correct NIC is set as WAN or LAN within pfSense.
Once it’s done, I can manage pfSense exactly the same way as a physical box—just with the added convenience of taking VM snapshots before any major config changes.
Example of Basic Commands or Files
Sometimes I need quick ways to troubleshoot or configure. Here are a few commands I regularly use in the pfSense console or shell:
# Check network interfaces and IP addresses
ifconfig
# Restart the DNS resolver service if I'm having DNS issues
pfSsh.php playback svc restart dnsresolver
# Show real-time firewall log activity
tcpdump -i WAN
# Backup config from shell (not the GUI)
cp /conf/config.xml /root/config_backup.xml
Common Troubleshooting Scenarios
No Internet Access on LAN
This often happens if I didn’t get a valid IP on the WAN side or if the ISP is still in router mode, conflicting with pfSense. I check Status > Interfaces to confirm the WAN interface has a correct IP and gateway.
If it’s a private IP, maybe I’m double NATed. If it’s 0.0.0.0, I suspect a DHCP or PPPoE error. Sometimes, I’ll need to turn off the ISP router for 30 seconds so it reassigns the public IP properly.
VLAN Traffic Isn’t Passing
I verify my switch is configured for the right VLAN tags on the correct port. Then in pfSense, each VLAN interface must have firewall rules allowing traffic out. By default, newly created VLAN interfaces may block traffic unless I add a pass rule for them. Checking logs can also reveal if traffic is being dropped due to missing rules.
Conflicting IP Subnets
Sometimes my LAN subnet matches the one used on the WAN side, especially if the ISP router is at 192.168.1.1. If so, I rename my LAN to something else, like 192.168.2.1/24 or 10.0.0.1/24, to avoid confusion. This is easy in the Setup Wizard or under Interfaces > LAN in the GUI.
My Personal Tips for a Smooth pfSense Journey
I’ve learned a lot while tinkering with pfSense. Here are a few tips that saved me headaches:
- Keep Regular Backups: The XML config file is small, so I store backups on my main computer and a cloud drive.
- Document VLAN IDs: VLAN confusion is common if I don’t track which ID belongs to which network. I label them carefully on my switch and in pfSense.
- Practice Good Rule Hygiene: Each new firewall rule is a potential vulnerability. I regularly review, remove or disable outdated rules, and rename them with clear descriptions.
- Use Built-In Tools: pfSense includes powerful diagnostics. Under Diagnostics > Ping or Diagnostics > Traceroute, I can quickly test connectivity from the firewall’s perspective, eliminating guesswork.
- Explore Packages: The pfSense Package Manager has tons of add-ons. I personally like Suricata for intrusion detection and pfBlockerNG for ad and geo-blocking. Just be sure your hardware can handle the extra load.
Conclusion
I’ve walked through everything from hardware considerations and virtualization tips to the actual installation steps and advanced features like VPN, DHCP server, and DNS resolver configurations. pfSense allows me to transform my home network into a robust lab for experimentation while ensuring top-notch security.
The platform’s flexibility is what keeps me hooked: one day I might add new VLANs for smart home devices, and the next day I might implement intrusion detection or set up an OpenVPN server for remote access.
Everything is in one place, with a friendly GUI and a console fallback for deeper troubleshooting. The community is enormous, so if I ever get stuck, I find a wealth of guides, forums, and plugin documentation.
I truly believe pfSense is one of the best open-source solutions out there for safeguarding your home network. I hope this guide has given you the confidence to start your own pfSense journey.
